
Overview
CapCut and InShot have both become go-to mobile editors for content creators. CapCut (from ByteDance, TikTok’s parent company) is known for helping users create trendy, polished videos quickly on their smartphones (moviemaker.minitool.com). It offers a rich feature set – all for free, with no ads or watermarks (moviemaker.minitool.com) – geared toward viral TikTok-style edits. InShot, originally a photo editor turned video app, is popular for Instagram Reels, TikTok videos, and YouTube Shorts (moviemaker.minitool.com). It’s praised for being easy and intuitive: a “fast, intuitive video editing app” ideal for quick social media clips (filmora.wondershare.com). InShot’s free version lets you trim, add music and filters, and export HD videos (though it does add a watermark and ads that can be removed by upgrading) (moviemaker.minitool.com). In short, CapCut is trend-focused and powerful, while InShot is simple and streamlined. Both cater to mobile-first editing, but your choice may depend on whether you value advanced tools or lightning-fast edits.
User Interface & Workflow
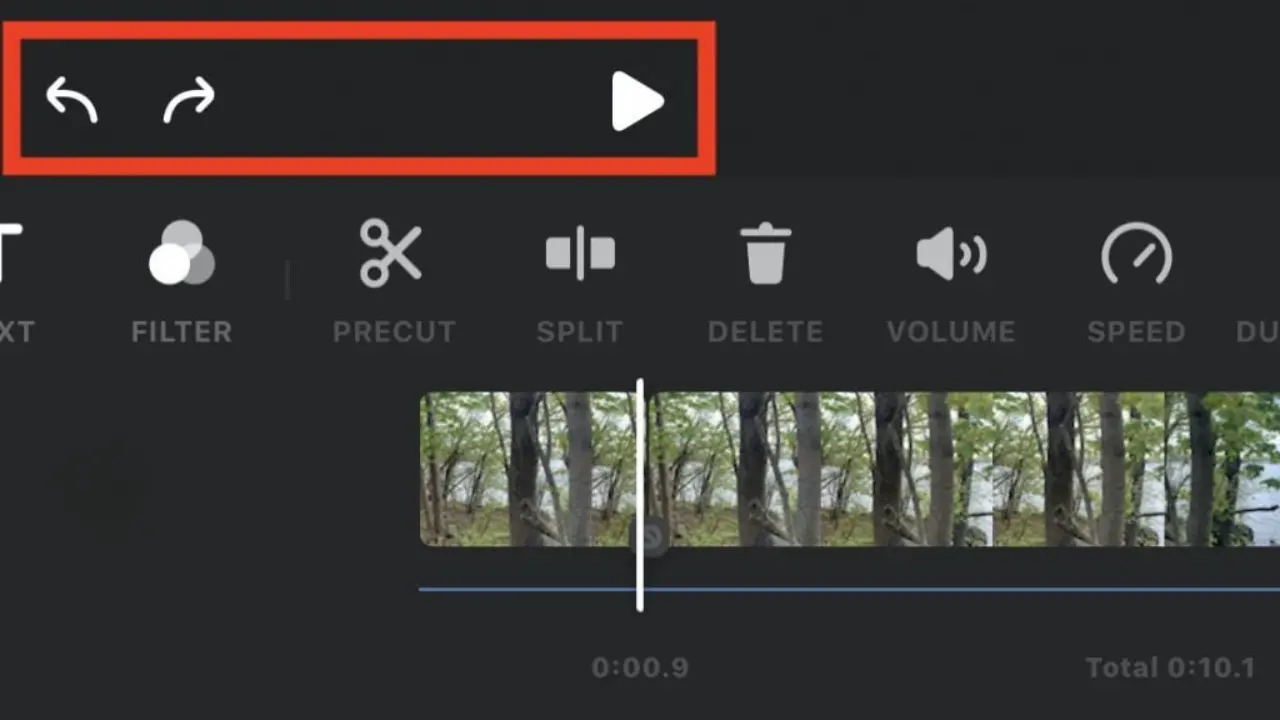
InShot’s interface is designed for speed. It presents a single linear timeline and displays all basic tools (trim, text, stickers, filters) right on the main screen for quick access (filmora.wondershare.com) (filmora.wondershare.com). This uncluttered, beginner-friendly layout helps you trim clips and add effects in a few taps. The photo below illustrates a typical one-track timeline with InShot’s menu icons above it (Trim, Filter, Audio, etc.). InShot’s flow is straightforward: import a clip, tap to split or trim, and then overlay text or music. Its timeline is simple and intuitive, making it easy to complete a quick edit without digging through submenus (filmora.wondershare.com) (filmora.wondershare.com).
CapCut’s interface is also clean, but more feature-dense. It uses a color-coded, multi-track timeline reminiscent of desktop editors (filmora.wondershare.com). You’ll find more menus and options – meaning a slightly steeper learning curve – but also more control when you need it (filmora.wondershare.com) (filmora.wondershare.com). CapCut’s menus let you pick layers, filters, and effects, and its timeline can show multiple video and audio tracks at once (see screenshot below). Locating a tool may take an extra tap or scroll if you’re new to it. In exchange, you get advanced features like keyframe animation and clip grouping that beginners won’t need. In short, InShot’s UI is uncluttered and optimized for efficiency, while CapCut’s design trades simplicity for power (filmora.wondershare.com) (filmora.wondershare.com).
Editing Features
Both apps cover the basics like trim, cut, merge, speed adjustment, and reverse. Beyond that, CapCut offers a more extensive toolkit. InShot supports multi-layer projects and keyframing for text/stickers (filmora.wondershare.com), but everything happens on its main timeline, and you generally work on one video track at a time. CapCut explicitly supports true multi-layer editing, so you can stack multiple video or audio clips, plus text or overlay clips, and adjust each independently (moviemaker.minitool.com). For example, CapCut lets you add motion tracking, align clips on multiple tracks, and finely edit each layer separately – features more akin to a desktop NLE (moviemaker.minitool.com) (filmora.wondershare.com).
- Multi-track editing: CapCut’s timeline can handle many stacked tracks (video, audio, overlays) with color coding (moviemaker.minitool.com). InShot also has layered support, but it’s simpler (note: InShot’s feature list includes adding photos, music tracks, and text on top of video) (filmora.wondershare.com). This means CapCut is better for complex edits where you might composite multiple clips, whereas InShot serves straightforward edits well.
- Keyframes and Animation: CapCut lets you keyframe motion, scale, opacity, and speed for fine animation (moviemaker.minitool.com). InShot also has a keyframe editor for stickers and text (for panning or scaling) (filmora.wondershare.com), but it’s more limited.
- Special effects: CapCut includes chroma key (green screen), motion tracking, and even 3D digital zooms. InShot offers basic effects and an extensive filter/sticker library (moviemaker.minitool.com) (filmora.wondershare.com). For example, you can apply InShot’s standard filters or transitions, but CapCut also has advanced gimmicks like background removal and trendy motion effects.
- Transitions: Both let you insert transitions between clips. InShot has a solid set of generic fades, wipes, and speed transitions (moviemaker.minitool.com). CapCut adds TikTok-style glowy zooms and quick jumps aligned to music beats. Recent CapCut updates often introduce new transitions synced with viral trend animations.
For speed ramps, color adjustments, or fine trims, both apps suffice. But if you need pro-level controls (like tracking objects or shaping motion curves), CapCut wins. One reviewer notes that in an “At a Glance” comparison, InShot’s editing is “mobile-focused” with keyframes and filters, while CapCut is “professional-grade” with multi-track, motion tracking, and color grading (filmora.wondershare.com).
Visual Effects & Filters
Visual flair is crucial on social media. Both apps offer filters and effects, but their focus differs. InShot includes a large library of ready-made filters and effects that cover many styles (vintage, modern, filmic, etc.) (filmora.wondershare.com) (filmora.wondershare.com). These tend to be generic and timeless, suiting anything from travel vlogs to promotional content (filmora.wondershare.com). You can tap to apply filters, then adjust intensity. InShot’s filters are easy to layer on top, and you can also add animated stickers or emojis. The interface for applying filters in InShot is straightforward: scroll through categories, tap to apply, and preview in real-time.
CapCut’s effects library is more trend-driven. It’s “directly tied to social media trends,” featuring AR stickers and augmented-reality (AR) filters like face-mapping masks, particle effects, and 3D zoom transitions that mimic popular TikTok/Reels styles (filmora.wondershare.com). For example, CapCut often showcases the latest viral filters (like retro glitches or anime-inspired face filters) the moment they appear on TikTok. It also has a growing set of animated text templates, dynamic intros, and “trend templates” that you can apply to your clips in one tap. These templates automatically combine trendy transitions, synced music, and text animations.
- Filters & AR effects: InShot’s filters are broad and simple. CapCut’s are flashier and tied to current trends (e.g. colorful glitch effects or trending meme overlays) (filmora.wondershare.com).
- Templates: CapCut includes several built-in project templates. These are pre-assembled sequences with preset transitions, effects, and music, which you can customize with your own footage (moviemaker.minitool.com). This makes it easy to recreate a popular style. InShot, by contrast, does not have many official templates – you generally start a project from scratch (though it does let you reuse your own saved filters or presets).
In summary, if you want your content to “feel TikTok-native,” CapCut’s constantly updated trend filters give it an edge. InShot’s filter library is still sizeable, but more evergreen. Either way, both apps allow fine-tuning overlay opacity and intensity so you can keep your brand’s look consistent.
Audio & Music Integration
Audio is half the experience on platforms like TikTok and Reels. Both InShot and CapCut let you add music tracks, sound effects, and voice-overs to your video, but CapCut again offers a more advanced set of tools.
InShot provides a good library of royalty-free tracks and sound effects. You can import your own audio or record a voiceover directly in the app. Its audio tools cover the essentials: trim and position clips on the audio timeline, apply fade-in/out, and adjust volumes (filmora.wondershare.com). There’s even a simple extractor to pull audio from an existing video file. InShot has an auto-caption feature that transcribes speech, though its customization is basic (you can change font and position) (filmora.wondershare.com).
CapCut matches all those basics. You can import multiple audio layers (music track plus voiceover plus sound effect). Beyond that, CapCut includes AI-powered audio features not found in InShot (filmora.wondershare.com). For instance, CapCut has Text-to-Speech (type a script and it generates a voice-over), an AI Voice Changer (change the pitch or style of voices), a Vocal Remover (strip the original audio’s vocals from a music track), and advanced noise reduction to clean up background hiss (filmora.wondershare.com). It also offers thousands of TikTok-licensed sound clips built into the app. Because CapCut is owned by the TikTok creators, you have seamless access to many trending TikTok sounds and licensed songs right in the app. InShot’s library is large, but not tied to TikTok’s ecosystem, so you might need to import trend sounds yourself.
Both apps support syncing audio clips to video and adjusting playback speed. You can also record a voice-over in either. But if you want more creative audio tricks or official social platform tracks without leaving the app, CapCut has the stronger offering. For basic needs, InShot’s tools cover “trim-add-fade-record” and are easy to learn.
Templates & Presets
CapCut offers a selection of project templates to help you get started quickly. These templates combine multiple editing elements – pre-set transitions, animations, music, and text – in a branded sequence. For example, you might load a “Dance Challenge” template that already has a beat-synced transition and then simply swap in your own clips (moviemaker.minitool.com). These templates can save a lot of time if you’re copying a popular style or challenge format. CapCut also provides instant text caption presets (styles and animations you can apply to title cards).
InShot does not have as many built-in multi-element templates. Instead, it focuses on giving you control piece-by-piece. You can save Snapshots of your own color grading or filters, but generally you create a project manually. It does offer layout presets for things like picture-in-picture or split-screen, and a gallery of static background images for slideshows. However, for the most part, InShot expects you to pick your video clips, then add text, stickers, and music manually.
If templates are important to you, CapCut clearly has the upper hand. It even labels many templates as “Trending” to highlight the ones catching on. InShot’s lack of premade templates can actually be a benefit if you want total creative control from scratch, but it means a bit more work. Either way, both apps have undo/redo, and you can usually tweak or replace any template element to fit your brand.
Social Media Integration
Both CapCut and InShot make sharing to social platforms straightforward. They let you choose the correct aspect ratio (vertical 9:16 for TikTok/Reels, square 1:1 for IG feed, or horizontal 16:9 for YouTube) before or after editing. InShot, for example, has one-tap aspect ratios and even template frames for each platform. InShot’s workflows are built around producing content for Reels, Stories, or Shorts: it even offers a direct “Instagram Story” template with stickers out of the box.
CapCut also caters to major platforms. It provides presets for TikTok, Instagram, and YouTube export settings. Both apps support exporting up to 4K resolution (at up to 60fps) for crisp video. Crucially, InShot’s notes specifically mention direct sharing: you can export and then tap shortcuts to post directly to TikTok, Instagram, or YouTube from within the app (filmora.wondershare.com). CapCut similarly lets you upload to TikTok or save to camera roll.
In our comparison table, InShot is noted for “direct sharing to Instagram, TikTok, and YouTube” (filmora.wondershare.com), and CapCut is highlighted for offering “platform-optimized presets” (filmora.wondershare.com). In practice, this means InShot puts sharing buttons on the export screen, while CapCut might prompt you to choose a platform format before saving. Both streamline the final step of getting your video onto social channels.
Platform-wise: CapCut has a slight edge with cross-device support. It has official apps on Android, iOS and desktop (Windows/Mac) (filmora.wondershare.com). So you could start editing on your phone and finish on a computer without redoing work. InShot is only available on mobile (iOS and Android). There are some third-party “InShot for PC” workarounds, but no official desktop client. If you need to do heavy projects on a PC or want a bigger screen editor with your existing mobile project, CapCut’s desktop version can be a deciding factor (filmora.wondershare.com).
Export & Performance
When it comes to exporting and app performance, both apps can handle high-quality outputs but have their own caveats.
- Resolution & quality: Both InShot and CapCut support exporting up to 4K at 60fps (filmora.wondershare.com) (filmora.wondershare.com). On modern phones, exports are generally fast — InShot in particular is noted for its quick, reliable exports (filmora.wondershare.com). CapCut’s desktop app can make heavy exports even faster by using more powerful PC hardware (filmora.wondershare.com). InShot’s processing is all on-device, so large HD files may take longer on older phones.
- Stability: While both apps are stable for most users, some complex projects can strain a phone. CapCut’s timeline can handle longer clips, but editing a very long video on a phone may cause freezing or lag if your device is low on memory. InShot’s simpler approach tends to be lightweight, but it may still crash if an edit is too large or if you load many high-res assets. In practice, keeping projects under a few minutes of video and omitting unnecessary high-res layers helps both apps run smoothly.
- Export settings: Each app lets you choose bitrate or quality level. You’ll get the best results exporting as high-resolution as the platform allows (e.g. 1080p or 4K). Note that exporting in 4K will produce much larger files — which may or may not be needed for social sharing, since TikTok and Instagram often recompress uploads anyway. Both apps try to optimize for the target aspect ratio and include any preset filters or compression needed for social sites.
Overall, neither app consistently outperforms the other in quality or speed. In tests, both delivered sharp 4K video. CapCut’s advantage is the option to move to desktop if you need to edit or render very long videos without draining your phone. InShot, staying mobile-only, is typically quick on handheld devices and rarely has a major resource hog unless your phone is very old. Just be sure to close other background apps or restart the app first if you encounter sluggishness with either.
Platform Support
CapCut is available on Android, iOS, Windows, and macOS. That means you can edit on a smartphone and also download a free CapCut desktop app to continue on PC/Mac. The desktop version supports the same projects (via cloud sync) and gives you more computing power for large edits. InShot is strictly mobile-only (Android and iOS). There is no official Windows or Mac client from InShot.
If your work sometimes involves editing on a laptop or tablet, CapCut is the clear winner here. The ability to offload to desktop can dramatically increase speed for big projects. For example, if you capture a 15-minute clip but only need a 30-second final reel, you could start trimming on phone then switch to the desktop app to finalize and export. InShot users must do everything on their phone or tablet.
For most social media clips (which are short), both work fine on mobile. But remember: CapCut’s desktop app is free and includes all the same AI and tools, whereas you would need to look for a separate tool to handle InShot edits on PC.
Pricing & Watermark
CapCut is entirely free to use – no ads, no in-app purchases, no watermark on exports (moviemaker.minitool.com). All of its features, effects, and templates are available from the start. Even the desktop version is free. InShot uses a freemium model. The app itself is free, but it shows ads and by default adds an “InShot” watermark on exported videos. To remove ads and the watermark (and unlock some premium effects and music), you must purchase InShot Pro. InShot offers monthly plans (about $3.99/month), an annual plan ($14.99/year), or a one-time lifetime purchase (around $34.99) (moviemaker.minitool.com).
For budget-conscious creators, CapCut’s no-cost model is attractive. If you only need basic editing, you can avoid spending anything with CapCut. With InShot, you’ll see their brand mark unless you opt to pay. This trade-off is important: some marketers don’t mind paying for the extra polish (removing an unwanted watermark can make videos look more professional), but others prefer free. Either way, both apps offer a free tier that lets you try most features – but remember the watermark.
Ideal Use Cases
- Quick Social-First Edits: If you need to bounce a concept to a finished video in minutes (say, shooting a short clip and immediately sending it to Instagram Stories or TikTok), InShot’s streamlined interface is hard to beat (filmora.wondershare.com). Its linear layout gets the job done with minimal taps.
- Trendy/Viral Content: If you’re chasing the latest TikTok or Reels trend (cool transitions, AR effects, viral meme templates), CapCut gives you tools to look “in the moment.” Its library of trending filters, song integrations, and one-tap templates empowers you to make content that feels contemporary (filmora.wondershare.com) (filmora.wondershare.com).
- Beginner-friendly: For novice editors or clients who may need to do quick edits, InShot is often more approachable. It’s less overwhelming and can remove a lot of technical decision-making. CapCut has more depth, which is great for pros but can confuse beginners.
- Desktop Editing: If you eventually want to continue projects on a computer, CapCut’s multi-device workflow is the advantage (filmora.wondershare.com). For example, if you filmed a longer vlog and need to cut highlights for multiple platforms quickly on PC, CapCut’s desktop app makes that easy (InShot has no desktop support).
- Complex Multi-Media Projects: For videos that require picture-in-picture, chroma key, or syncing multiple clips in a precise way, CapCut’s multi-track timeline and professional tools are better. InShot is fine for single-stream montages or simple transitions, but complicated layering can become cumbersome.
In summary, many marketers find InShot best for fast, no-frills edits – trimming a clip, adding a sticker, and sending it out immediately. CapCut is better when you have time to polish: it can make a short clip look highly sophisticated with minimal effort. That said, both apps are “free to try,” so you can experiment. You might find that using both workflows depending on the content is ideal: e.g., cut quick daily stories in InShot, but use CapCut when you plan a major Reel or need consistent style across multiple videos.
Common Issues & Fixes
Even popular apps have quirks. Here are some common problems you might run into and how to address them:
- Crashes or Freezes (CapCut): Sometimes CapCut will freeze on export or show a black screen. This is often due to server issues or connectivity. CapCut requires internet for assets and syncing, so a poor connection can cause trouble (filmora.wondershare.com). Fixes: Check if CapCut’s servers are down by looking at status sites or social media, switch to a stable Wi-Fi or restart your router, and make sure you have enough storage space. Updating CapCut and your OS to the latest version also helps (filmora.wondershare.com) (filmora.wondershare.com). If all else fails, saving your work and reinstalling the app can clear corrupted files. For older or low-end devices, try closing background apps or using the desktop version if possible.
- Crashes or Freezes (InShot): InShot is generally stable, but it can crash if a project is very large or if the app cache is corrupted. A first step is to force-close InShot and reopen it (appsupports.co). If problems persist, go to the app store and update to the newest version. A clean reinstall (delete and re-download the app) often fixes stubborn glitches. Also check your device OS version – outdated Android or iOS can conflict. Most issues are resolved by these simple steps (appsupports.co).
- Watermark or Ads (InShot): The free InShot always adds its watermark. If you don’t want that logo on your video, you must upgrade to InShot Pro; there’s no other way around it (moviemaker.minitool.com). The ads can also interrupt editing; they can be removed only via purchase. CapCut, by contrast, never watermarks or advertises within the app, so you won’t have these issues with CapCut’s free version (moviemaker.minitool.com).
- Slow Performance: Editing multiple layers or very long videos can slow any mobile app. InShot can lag if you heavily stack stickers or use high-resolution footage on a modest phone. CapCut’s multi-layer timeline can also lag on older devices. If editing is slow, try reducing video resolution or length, or use the desktop CapCut for heavy projects (filmora.wondershare.com). Closing other apps and clearing cache (in device settings) can free up memory.
- Export Errors: If a project won’t export, common culprits are running out of storage space, having unusual characters in the project title or file name, or other minor bugs. Ensure your phone has enough free space. Try exporting a shorter section of the project to see if a particular clip is corrupt. InShot users sometimes need to grant the app full storage permission in phone settings. If export repeatedly fails, restarting the app and device usually fixes the issue.
- Format Mismatch after Sharing: Occasionally a video may look fine but gets cropped by Instagram or TikTok after upload. Always double-check aspect ratios: use 9:16 for TikTok/Reels and 1:1 (or 4:5) for Instagram feed before posting. Both apps let you preview and tween the framing. If needed, you can manually zoom or reposition in the app’s crop tool.
- Audio Sync/Quality: Rarely, trimming adjustments can throw audio slightly off. Re-snapping the audio when editing or reducing the project framerate can fix it. If there’s hiss or static, CapCut’s audio noise reducer helps. InShot users can try reloading the audio track or exporting as a lower bitrate if sync issues occur.
In general, most issues in either app are solved by updating to the latest version, closing and reopening the project, or restarting the device. For stubborn bugs, checking online forums often reveals quick fixes (for example, CapCut’s known fixes mention checking DownDetector and internet quality (filmora.wondershare.com)). If all else fails, you could export the raw videos and try a different editor, but that’s rarely needed for normal social video work.
VIDIO Shortcut
For even more automation, consider VIDIO’s AI-powered editing tools. VIDIO isn’t a direct replacement for CapCut or InShot, but rather a “one-click” solution to many editing steps. For example, VIDIO’s AI Video Editor can take an uploaded clip and automatically trim out dead space, detect the highlight moments, and stitch them into a concise short. You simply set your target length (say, 30 seconds) and the AI does the rest, including adding smooth transitions and background music if desired. It can also auto-generate captions (speech-to-text) on multiple languages, saving you the manual subtitling step.
Some handy VIDIO features for social video creators include:
- Auto-Highlight & Summary: The editor finds and keeps the most engaging segments of a longer video (ideal for creating teasers or highlights reels) without manual cutting.
- Multi-Platform Resizing: VIDIO can simultaneously output your video in different aspect ratios (e.g. a vertical version for TikTok/Reels, a square one for Instagram, and a horizontal one for YouTube) with one click. This auto-crops and reframes your content so you don’t have to edit three times for each platform.
- Auto-Captioning & Audio Cleanup: It automatically transcribes dialogue into captions and can overlay them in an attention-grabbing style. It also offers voice cleaning tools to remove background noise from audio clips.
- Enhancement & Effects: VIDIO’s AI Upscaler can boost video resolution up to 4K, and its Brightener instantly fixes exposure on dark clips. The Stabilizer smooths shaky smartphone footage, and the Video Sharpen tool can make edges crisper. These instant fixes can be a huge time-saver if you have uneven-quality footage.
- Background & Object Tools: If you need a clean studio look, VIDIO can auto-remove or blur video backgrounds without a green screen. You can also isolate and replace objects or people in the shot (for example, to swap in a branded background or blur out unwanted faces or license plates) using its rotoscoping tools.
- Privacy & Branding: Need to anonymize a face or blur sensitive info like a license plate? VIDIO has dedicated face-blur and privacy filters (and even voice anonymization) you can apply automatically.
In short, while CapCut and InShot are great for hands-on editing on your phone, VIDIO’s AI suite lets you batch-process many edits at once. For a social media marketer, this means you can upload your raw footage to VIDIO and get platform-ready clips in seconds, rather than spending time on each cut and template. Either use it as a quick-start before touching up in CapCut/InShot, or as a final polish to get multiple formatted versions instantly. It’s especially useful when you have tight deadlines— VIDIO can “find highlight moments and format videos for multiple platforms in a click,” significantly cutting down editing time compared to doing it manually.
By combining tools: you might do a quick cut on CapCut, then run the result through VIDIO to auto-crop and subtitle it for various channels (or vice versa). The result is higher efficiency without sacrificing quality or consistency across your TikTok, Instagram, and YouTube content.
Common Issues & Fixes: CapCut can sometimes glitch if its servers are down or your internet is spotty (filmora.wondershare.com). If CapCut shows a black screen or fails to load assets, try checking DownDetector for outages or switch to a stronger connection (filmora.wondershare.com). Also ensure your phone meets the app’s requirements—older devices or full storage can cause crashes (filmora.wondershare.com). For InShot, a crash often means clearing its cache: simply close and reopen the app, or reinstall it (appsupports.co). If you see a watermark you can’t remove, remember that’s InShot pushing you to pay; only the paid version removes it (moviemaker.minitool.com). In any case, keep your apps and OS updated, and close background apps if performance lags. These basic fixes tend to resolve most edit-time hiccups in either app.